Why using an automatised workflow?
When you are coding, your life is a succession of: launching your code, waiting while it runs, discovering an issue and … restarting from scratch:

Artwork from Pokemon USA
So, to make your code life easier you can automatised your worklow so that re-running all your analysis only consist in running one file!
Dependencies between the different steps of your analysis workflow have to be
stated by using a make.R file (easy if your
worklow is linear that is to say if one step leads to another unique one) or the targets package (easier to use than the make.R file if your worklow is not linear)
In this tutorial, we will see the two methods starting with the make.R file.
We assumed that you have already done the 03 - Create and define your first R function and analysis script
Using the make.R file
You have to create a make.R file on the project root, for instance by using
the file.create() function or by using
File > New File > Rscript if using RStudio and then saving the file on the
project root:
# Command to create a make.R file on the project root if not done before:
file.create("make.R")
This file will contains everything needed to run your project: for instance loading the dependencies your project relies on, functions you have coded, sourcing scripts containing code for your analysis etc.. In this method, running this folder will run the whole workflow!
A - 1 - Load the data and depencies
- The first thing to code in the
make.Rfile is to automatise the data loading.
To do so you must use the here package (link to the here website): it helps to use relative paths (defined on the project root) instead of absolute ones as everyone as a different absolute path.
In our example, we will load the Pokemon dataset, which is in the data folder on the project root.
We use the here() function of the here package the different arguments = parameters of the function are the folders of the path leading to the file and the name of the file to open as follows:
 # 1st line of the make.R: give the relative path to the data and read the data:
  data_poke <- readr::read_csv(here::here("data", "pokemon.csv"))
NOTE: Using package_name::function_name and not library(package_name) because
different functions belonging to different packages can have the same name, thus
using this coding style helps the code readability and prevent conflicts.
- Then, we must automatise dependencies loading that is to say the name of the packages used in the functions we have created and defined.
Reminder: In the tutorial 03 - Create and define your first R function and analysis script, these dependencies have been added to the Import part of the DESCRIPTION file by
using the following command:
# command to add dependencies to the DESCRIPTION file:
usethis::use_package("name_of_the_package")
To install the dependencies your project is relying on, use the install_deps() function of the devtools package as follow:
 # 2nd line of the make.R: install dependencies
devtools::install_deps()
The first two lines of the make.R file are coded!

Artwork from Amino App
A - 2 - Source your R functions
If you have defined and coded specific R functions collected in the R folder on the project root, you have to source the file(s) that contain(s) them. It allows the use of these functions in the R scripts for the analysis. To do so, you use the source function and
we never forget to use relative paths using the here package:
 # 3rd and 4rth lines of the make.R: load defined functions of the R folder
source(here::here("R", "01_clean_data_function.R"))
source(here::here("R", "02_plot_function.R"))
Now our functions are sourced!

Artwork from ClipArtMax
A - 3 - Source your R scripts for analysis
Then, the last step is to run the R script(s) containing code for analysis. They are usually contained in an analysis folder and some of them (or all of them) can call functions you have coded (and which are in the R folder).
You have already coded some R scripts for the analysis in the 03 - Create and define your first R function and analysis script tutorial. Thus we are sourcing these files using the following command:
# 5th and 6th lines of the make.R: run analyses scripts
source(here::here("analysis", "01_clean_data.R"))
source(here::here("analysis", "02_plot.R"))
Now our scripts for analyses are sourced, we are ready to compute the whole project!

Artwork from Dexerto
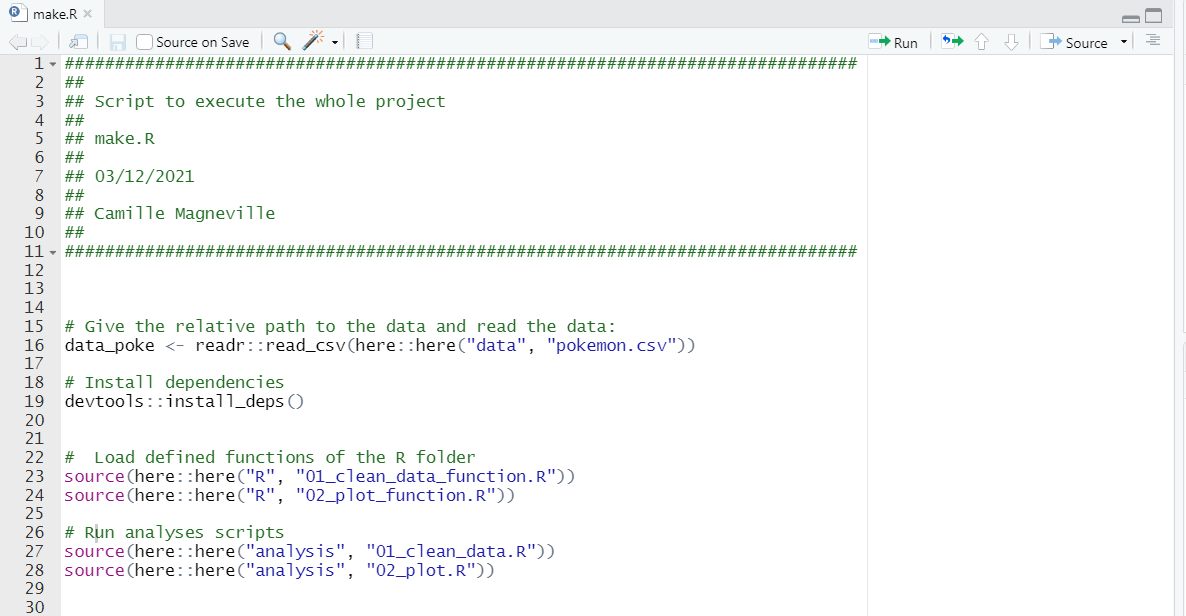
A - 4 - Have a look to your finished make.R file
The make.R file is now finished for our Pikachu Project! If you want to re-run all your project, you just have to run this file and in only one step, everything is computed, how nice!

So far, that’s what your make.R file looks like!